
10 Editing Prompts for ChatGPT That Fix Photos Without Ruining Them
Most editing prompts fail for one simple reason: they describe the change you want and say nothing about everything you want left alone. You ask ChatGPT to remove a bin from a street photo, and the sky shifts color, a window disappears, and the whole scene feels slightly off.
This article gives you ten use cases built to prevent that, from object removal and background swaps to restoring a faded scan and fixing one small flaw after the fact. You will also get a simple framework for writing your own, plus habits that keep results natural. Every prompt on this list is written to work with ChatGPT, and you only need one photo to start.
The Short Version
Good edits start with what stays the same. Before you describe any change, tell ChatGPT which details must not move: the layout, the shape of the main subject, the colors, the camera angle. Then ask for one clear change, name the light you want, and say the new part should match the rest of the image. Short, specific instructions beat long, decorative ones, and a sharp, well-lit source photo gives the model far more to work with.
Expect to iterate. When a result is nearly right, do not regenerate the whole image, because you may lose the parts you liked. Send a small follow-up that names the single flaw, such as a smudged corner or a color that drifted, and repeat that everything else stays unchanged. Most images improve in one or two rounds of small fixes, and you keep control of the look the whole time.
What a Good Prompt Actually Does
A prompt is a short creative brief. It tells the model what it is looking at, what you want to see, and what mood or light should hold the scene together. For image work, the brief has to be specific enough that another person could follow it without guessing.
There are two common situations. In text-to-image, you start from nothing and describe a scene in words, so the model fills in every detail itself. A foggy harbor at dawn, wooden boats, soft grey light, wide shot. In image-to-image, you start with your own photo and ask for a change. The model already has plenty of detail to respect, so your job shifts from describing a scene to controlling what moves.
That is why separating protected details from changing details matters. If you only say what to change, the model decides on its own which other parts are flexible, and that is how skies shift and furniture vanishes. A protected list removes the guesswork. Keep the building, windows, and shadows exactly as they are. Change only the sky to soft sunset orange. Two short sentences, and the boundary is clear. Nearly every edit in this article relies on that split: first the keep list, then one change, then a note about light.
How to Use the Prompts on ChatGPT
The flow is short, and it only has a few moving parts.
- Open ChatGPT and start a new conversation. Use the browser or the app, whichever you prefer. A fresh chat keeps instructions from earlier requests from leaking into your new edit.
- Attach your photo to the chat. Say that you want to edit this image, so ChatGPT treats the upload as the source and not as loose inspiration.
- Paste one prompt from the list below and send it. Swap in the specifics of your photo if the prompt calls for them, such as which object to remove or which color to use.
- Review the result next to your original. If something needs to change, reply in the same conversation with a short follow-up that names only that detail.
Tip: choose a clear source image. Pick a sharp, evenly lit photo where the subject is easy to see. A blurry or heavily shadowed original forces the model to guess, and guessing is where odd details appear.
Tip: make small follow-up edits inside the chat. When the result is close, reply with one narrow correction instead of starting a new conversation. The model keeps the context of what you have already approved, and the parts you like are far less likely to change.
Best Editing Prompts
Each use case below is a different kind of edit, so you can jump to the one that matches your photo. The examples all follow the same idea: protect first, change one thing, then match the light.
1. Remove a Distracting Object from the Frame
A stray trash bin, a power line, or a stranger’s bag can ruin an otherwise good photo. This suits anyone cleaning up travel shots or listing photos. The tricky part is the gap left behind: the model has to invent what was hidden, and it may redraw nearby textures.
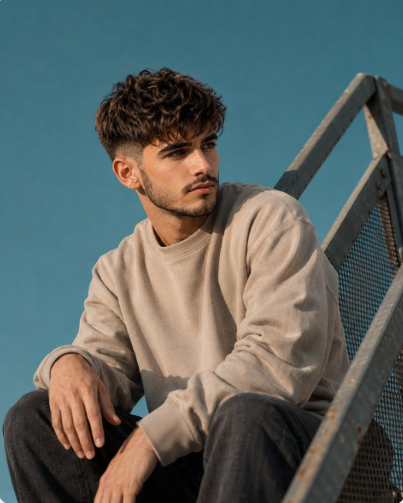
[USE REFERENCE IMAGE 1 AS THE EXACT AND NON-NEGOTIABLE SOURCE FOR THE ENTIRE PHOTOGRAPH, PRESERVING THE COMPOSITION, CAMERA POSITION, PERSPECTIVE, SUBJECT PLACEMENT, POSE, FOREGROUND STRUCTURE, BACKGROUND, LIGHTING, SHADOWS, COLOR GRADING, DEPTH OF FIELD, AND OVERALL CINEMATIC ATMOSPHERE EXACTLY AS SHOWN. USE REFERENCE IMAGE 2 ONLY AS THE IDENTITY REFERENCE FOR THE REPLACEMENT CHARACTER, AND REPLACE ONLY THE ORIGINAL PERSON IN REFERENCE IMAGE 1 WITH THE PERSON SHOWN IN REFERENCE IMAGE 2 WHILE KEEPING EVERYTHING ELSE IN THE SCENE COMPLETELY UNCHANGED. PRESERVE THE TARGET CHARACTER’S REAL AND RECOGNIZABLE IDENTITY WITH MAXIMUM ACCURACY, INCLUDING THE EXACT FACE SHAPE AND HEAD PROPORTIONS, HAIRSTYLE, HAIRLINE, HAIR TEXTURE, NATURAL HAIR VOLUME, FOREHEAD SHAPE, EYEBROWS, EYE SHAPE, EYE SPACING, NATURAL GAZE, NOSE STRUCTURE, LIPS AND MOUTH PROPORTIONS, CHEEKBONES, JAWLINE, CHIN, EARS, SKIN TONE, NATURAL SKIN TEXTURE, FACIAL HAIR IF PRESENT, NECK LENGTH, SHOULDER WIDTH, AND NATURAL BODY PROPORTIONS AND BUILD. THE FINAL FACE MUST BELONG ENTIRELY TO THE TARGET CHARACTER, WITH NO RETAINED, BLENDED, OR TRANSFERRED RECOGNIZABLE FACIAL FEATURES FROM THE ORIGINAL MODEL.PRESERVE THE INDUSTRIAL METAL RAILING EXACTLY AS SHOWN IN REFERENCE IMAGE 1, BEGINNING NEAR THE LOWER-MIDDLE AREA AND EXTENDING DIAGONALLY TOWARD THE UPPER-RIGHT CORNER, WITH THE SAME DIRECTION, SIZE, THICKNESS, FOREGROUND PERSPECTIVE, VERTICAL SUPPORTS, RECTANGULAR METAL PANEL, SCREWS, JOINTS, WORN GREY METAL SURFACES, SUBTLE ORANGE-BROWN RUST MARKS, SCRATCHES, AND REALISTIC IMPERFECTIONS. THE CLOSEST PARTS OF THE RAILING MUST REMAIN SLIGHTLY OUT OF FOCUS BECAUSE OF THEIR PROXIMITY TO THE LENS, AND THE RAILING MUST NOT BE MOVED, REDESIGNED, CLEANED, REMOVED, OR REPLACED.
PRESERVE THE ORIGINAL RELAXED STANDING POSE BEHIND THE RAILING, INCLUDING THE SAME SHOULDER ANGLE, TORSO ORIENTATION, SUBTLE FORWARD LEAN, ARM PLACEMENT BEHIND OR NEAR THE RAILING, NATURAL POSTURE, AND CALM, SELF-CONFIDENT BODY LANGUAGE. THE TARGET CHARACTER’S HEAD MUST REMAIN TURNED TOWARD FRAME-RIGHT, WITH THE CHIN SLIGHTLY RAISED, LOOKING INTO THE DISTANCE RATHER THAN AT THE CAMERA, AND THE EXPRESSION SHOULD REMAIN SERIOUS, THOUGHTFUL, AND UNDERSTATED IN AN EDITORIAL WAY.
THE CLOTHING MAY BE SUBTLY REDESIGNED TO SUIT THE TARGET CHARACTER’S BODY TYPE, PERSONALITY, AND NATURAL VISUAL STYLE, BUT IT MUST PRESERVE THE ORIGINAL CLOTHING CATEGORY AND GENERAL SILHOUETTE AS A MINIMALIST CASUAL OUTFIT FEATURING A RELAXED OR OVERSIZED CREWNECK SWEATSHIRT MADE FROM SOFT MEDIUM-WEIGHT COTTON OR COTTON-FLEECE FABRIC, WITH DROPPED OR RELAXED SHOULDERS, LONG SLEEVES, AND UNDERSTATED CONTEMPORARY STYLING. USE A WARM NEUTRAL COLOR SUCH AS SAND BEIGE, LIGHT TAUPE, WARM STONE, MUTED CREAM, PALE CAMEL, OR SOFT GREY-BEIGE, AND KEEP THE GARMENT PLAIN, PREMIUM, AND MINIMAL WITH NO VISIBLE LOGOS, PRINTS, TYPOGRAPHY, SPORTS BRANDING, OR DISTRACTING ACCESSORIES. PRESERVE REALISTIC FABRIC BEHAVIOR, INCLUDING NATURAL SHOULDER FOLDS, SLEEVE CREASES, ELBOW FOLDS, COMPRESSION AROUND THE RAILING, REALISTIC FABRIC WEIGHT, SUBTLE COTTON TEXTURE, AND RIBBED COLLAR AND CUFFS.
PRESERVE THE EXACT NATURAL SUNLIGHT DIRECTION AND INTENSITY, WITH SUNLIGHT COMING FROM FRAME-LEFT AND SLIGHTLY ABOVE THE CHARACTER, CREATING WARM DIRECTIONAL HIGHLIGHTS ACROSS THE FOREHEAD, HAIR, CHEEKBONES, NOSE, JAWLINE, NECK, UPPER CHEST, SHOULDERS, AND SWEATSHIRT FABRIC, WHILE MAINTAINING DEEP BUT NATURAL SHADOWS UNDER THE EYEBROWS, NOSE, CHIN, AND JAW. KEEP THE COMPLEMENTARY CONTRAST BETWEEN THE WARM SUNLIGHT AND THE COOL TURQUOISE SKY, AND DO NOT INTRODUCE STUDIO LIGHTING, ARTIFICIAL RIM LIGHTS, FLASHES, NEON LIGHTS, OR EXTRA FILL LIGHTS.
PRESERVE THE CLEAN, CLOUDLESS TURQUOISE-BLUE SKY IN THE BACKGROUND AND DO NOT ADD CLOUDS, BIRDS, TREES, BUILDINGS, WIRES, SIGNS, TEXT, OR ANY OTHER ADDITIONAL OBJECTS, SO THE BACKGROUND REMAINS SMOOTH, MINIMAL, AND DISTRACTION-FREE. MAINTAIN THE ORIGINAL LOW-ANGLE EDITORIAL PERSPECTIVE WITH THE VISUAL CHARACTERISTICS OF A FULL-FRAME CAMERA, AN APPROXIMATELY 50MM TO 65MM LENS, AN APERTURE AROUND F/2.8 TO F/4, LOW CAMERA HEIGHT, FAST DAYLIGHT SHUTTER SPEED, PRECISE FOCUS ON THE TARGET CHARACTER’S EYES AND FACE, REALISTIC FOREGROUND BLUR, SUBTLE BACKGROUND SEPARATION, AND NO WIDE-ANGLE FACIAL DISTORTION.
PRESERVE THE EXACT TEAL-AND-WARM-NEUTRAL CINEMATIC COLOR PALETTE, INCLUDING THE DEEP TURQUOISE SKY, WARM NATURAL SKIN HIGHLIGHTS, SOFT BEIGE CLOTHING, SLIGHTLY MUTED INDUSTRIAL METAL, MEDIUM-HIGH CONTRAST, CONTROLLED HIGHLIGHTS, GENTLY DEEPENED SHADOWS, SUBTLE FINE FILM GRAIN, NATURAL TEXTURE, REALISTIC SKIN PORES, INDIVIDUALLY VISIBLE HAIR STRANDS, AND REALISTIC FACIAL HAIR IF PRESENT. THE FINAL RESULT MUST LOOK LIKE AN AUTHENTIC PROFESSIONAL OUTDOOR FASHION PHOTOGRAPH, NOT A GENERATED OR COMPOSITED IMAGE.
NEGATIVE PROMPT: DIFFERENT CAMERA ANGLE, EYE-LEVEL CAMERA, HIGH-ANGLE VIEW, CHANGED CROP, CHANGED CHARACTER POSITION, ALTERED RAILING, MISSING RAILING, POLISHED NEW RAILING, EXCESSIVE RUST, CLOUDS, BUILDINGS, BIRDS, TREES, DIRECT EYE CONTACT, SMILING, EXAGGERATED EXPRESSION, DIFFERENT POSE, CROSSED ARMS, HANDS IN POCKETS, INCORRECT ANATOMY, EXTRA FINGERS, FUSED HANDS, DUPLICATED LIMBS, DISTORTED FACE, BLENDED IDENTITIES, ORIGINAL MODEL’S FACIAL FEATURES, ALTERED TARGET IDENTITY, PLASTIC SKIN, EXCESSIVE RETOUCHING, ARTIFICIAL LIGHTING, FAKE BLUR, EXTREME BOKEH, OVERSATURATED COLORS, HDR, CGI, 3D RENDER, ILLUSTRATION, ANIME, PAINTING, LOGO, TEXT, WATERMARK.]
2. Replace a Messy Background
Cluttered walls, busy streets, or a half-open closet behind your subject pull attention away from it. This suits sellers, bloggers, and anyone sharing a photo of an object or pet. The risk is rough edges where the subject meets the new backdrop, especially around fur, glass, and thin handles.
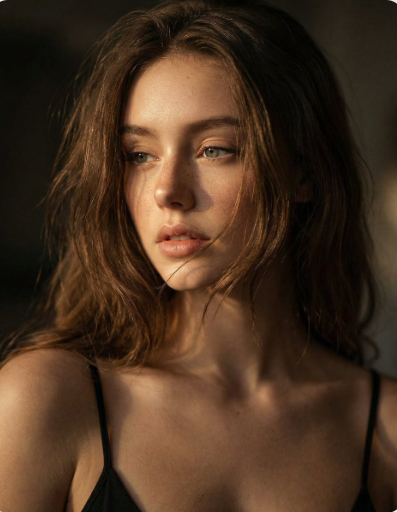
[Ultra-realistic Cinematic Close-up Portrait, Replace Subject With My Reference Image.
A Young Woman Shown From Shoulders Up, Head Slightly Turned, Eyes Looking Off-frame With A Soft. Thoughtful Expression. Natural Facial Proportions, Visible Skin Texture, Subtle Freckles And Fine Details Preserved.
Loose, Slightly Messy Hair Strands Falling Across The Face, Creating A Natural, Intimate Mood, Wearing A Thin-strap Black Top, Minimal Styling, No Heavy Accessories. Lighting Is Dramatic And Cinematic: Warm Directional Light Hitting The Face From One Side, Deep
Shadows On The Opposite Side, Creating Strong Contrast And Emotional Depth. Background Is Dark And Unobtrusive, Softly Blurred, Keeping Full Focus On The Face.
Shot With A Shallow Depth Of Field, 85mm Portrait Lens Look, Creamy Bokeh, High Dynamic Range, Natural Color Grading With Warm Highlights And Soft Shadows, Realistic Skin Tones, No Artificial Glow
Photorealistic, Ultra-high-definition, Editorial Portrait Photography, Cinematic Realism, Film-quality Lighting, Zero Ai Artifacts.
]
3. Fix a Dim, Flat Photo
Indoor shots taken at dusk or in a dim cafe often look grey and muddy. This one suits casual photos you want to rescue without changing the scene. The trick is asking for better light without letting the model repaint faces, objects, or the layout of the room.
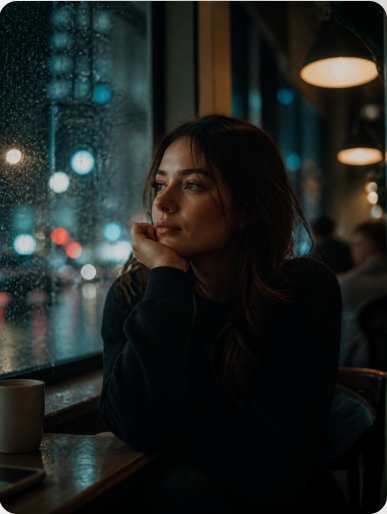
[Ultra-realistic cinematic portrait of a person sitting beside a rainy window in a quiet café at night, soft reflections on glass, natural skin texture, detailed eyes, cozy ambient lighting, candid photography style, shallow depth of field, authentic emotions, shot on DSLR, photorealistic, moody color grading, premium editorial quality, ultra detailed, no CGI, no cartoon, no text]
4. Change the Time of Day
Turning a midday shot into golden hour, or a daytime street into blue hour, is a popular request for landscapes and buildings. It suits travel and real estate photos. Every shadow, reflection, and window glow has to change together, or the scene looks pasted.
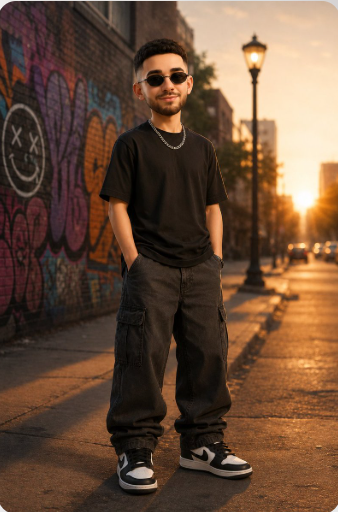
[Transform this character into a stylish, realistic 3D cartoon with a modern streetwear aesthetic while preserving the same facial features, hairstyle, beard, sunglasses, and confident pose. Replace the white football jersey with an oversized matte black t-shirt, charcoal gray cargo pants, a silver chain, and black-and-white sneakers. Change the background to a cinematic urban street at golden hour with colorful graffiti walls, glowing street lamps, warm sunset lighting, soft bokeh, and a shallow depth of field. Use ultra-detailed Pixar-inspired 3D rendering, realistic skin textures, soft global illumination, high-quality shadows, vibrant colors, sharp focus, full-body portrait, 8K, premium character design, fashionable, clean composition, highly detailed, photorealistic CGI.]
5. Product Photo on a Clean Backdrop
A mug, a pair of shoes, or a handmade candle photographed on a cluttered desk rarely looks ready to sell. This suits small shops and anyone listing items for resale. What makes it hard is keeping the product’s shape, label, and color accurate while the surroundings change.
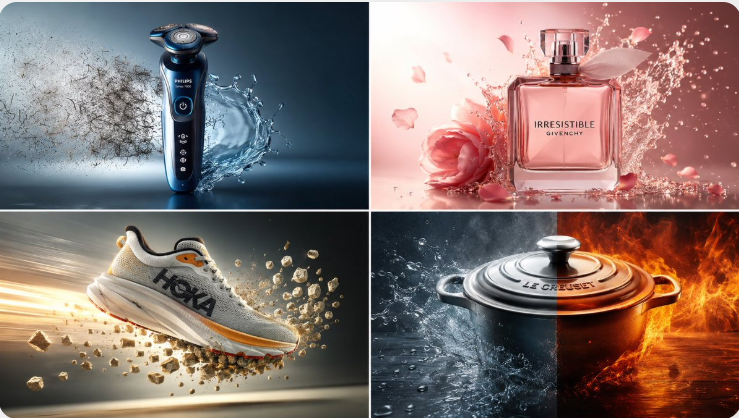
[Upload a clear product image first.
Create a premium 16:9 commercial product ad using the uploaded product as the exact hero reference.
Visual system: “Benefit Collision”
The product must be large, sharp, premium, and instantly recognizable. Keep the logo, label, shape, materials, colors, and packaging details clear and readable.
Do not make a normal beauty shot.
Build the scene around one powerful visual collision that proves the product benefit instantly.
Choose two opposing forces based on the product:
clean vs messy
hot vs cold
speed vs resistance
soft vs harsh
fresh vs dull
protected vs exposed
smooth vs rough
calm vs chaos
luxury vs raw materialPlace the product at the exact point where both forces collide.
Composition:
foreground texture, midground product hero, background atmospheric force.
The viewer should understand the benefit in one second.Style:
premium agency campaign, cinematic product photography, realistic physics, dramatic lighting, tactile material detail, sharp reflections, controlled chaos, luxury commercial finish, scroll-stopping 16:9 hero image.Avoid:
tiny people, miniature worlds, random effects, fake floating text, hidden logo, unreadable label, cluttered background, weak product scale.]
6. Create a high-end fine-art editorial portrait of a striking young man
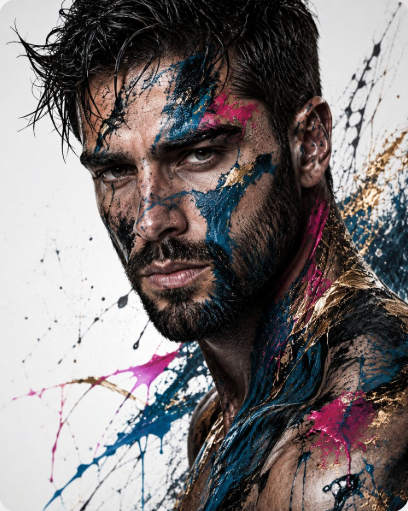
Create a high-end fine-art editorial portrait of a striking young man use image for face reference with beard also with tousled, wet-looking dark hair, intense light eyes, defined cheekbones, strong jawline, and subtle stubble. Tight close-up, three-quarter angle, dramatic expression, cinematic studio lighting, ultra-realistic skin texture, highly detailed eyes.
The portrait is predominantly monochrome black, white, and silver, with dramatic abstract paint splashes layered across the face, neck, and upper torso. Use deep teal/blue paint as the dominant accent, with vivid magenta/pink splashes and luxurious metallic gold streaks. Paint should appear fluid, organic, and expressive, with realistic drips, splatters, brush strokes, and translucent layers partially revealing the face beneath.
Minimal white background with energetic abstract paint marks around the subject. Sophisticated fashion-art aesthetic, luxury magazine editorial, contemporary fine-art photography, high contrast, dramatic shadows, sculptural lighting, atmospheric depth, extremely detailed, photorealistic, 8K, sharp focus, premium composition, vertical portrait, no text, no watermark.
7. Extreme macro close-up portrait of a young woman’s face
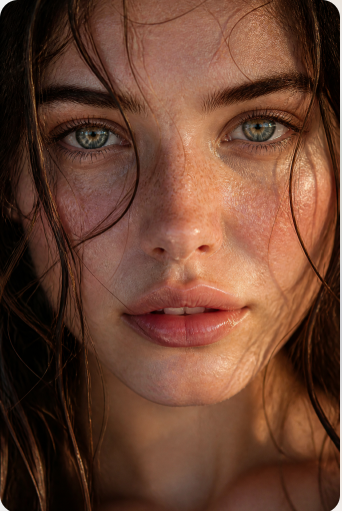
[Extreme macro close-up portrait of a young woman’s face, striking sea-green eyes, detailed iris patterns, soft natural sunlight, delicate freckles across the nose and cheeks, glowing dew-covered glass skin texture, glossy nude lips slightly parted, wet messy strands of dark brown hair framing the face, 85mm lens photography, shallow depth of field, sharp focus on eyes, ultra-realistic, hyper-detailed skin pores and texture, photorealistic beauty shot, 8k resolution –ar 9:16 –style raw]
8. Ultra-realistic beauty portrait captured in a tight close-up
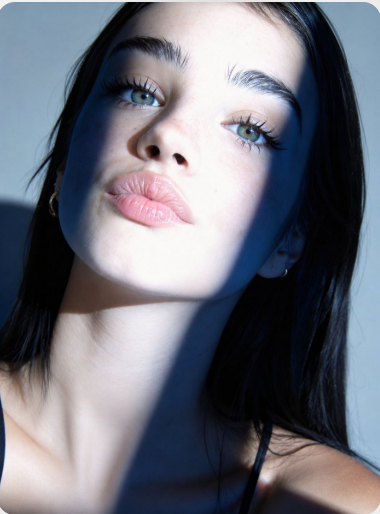
Ultra-realistic beauty portrait captured in a tight close-up with a full-frame mirrorless camera and an 85mm f/1.4 portrait lens. A beautiful young woman with long straight dark hair, luminous fair skin, subtle natural freckles across the nose, thick well-groomed eyebrows, long curled eyelashes, and striking light blue-green eyes gazes softly toward the camera with a calm, relaxed expression and slightly parted glossy nude lips. She wears minimal “no-makeup” makeup with natural skin texture preserved and small gold hoop earrings.
The composition fills almost the entire frame with her face, leaving very little background visible. Dramatic natural sunlight streams through a nearby window, creating a bold diagonal shadow across one side of her face while illuminating the other side with soft golden light. High dynamic range, cinematic contrast, crisp skin detail, realistic pores, catchlights in the eyes, shallow depth of field, soft blurred neutral background, editorial beauty photography, luxury skincare campaign aesthetic, ultra-photorealistic, 8K, HDR, natural color grading, razor-sharp focus on the eyes, premium fashion magazine quality.
9. Hyper-realistic editorial portrait of a young woman against a bold deep teal-blue solid background
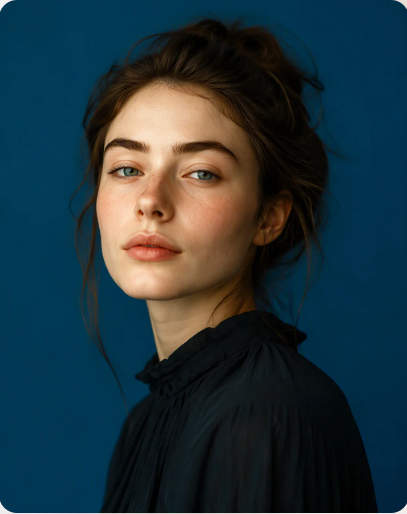
Hyper-realistic editorial portrait of a young woman against a bold deep teal-blue solid background, full photorealistic facial detail, natural serene expression. Strong graphic design composition, high-impact colour field creating modern editorial feel. Fine-art portrait photography, 4:5 vertical, 8k, no text.
10. A studio portrait, medium shot of a
woman
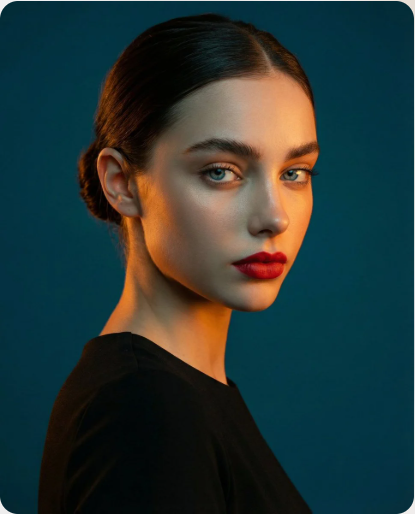
A studio portrait, medium shot of a
woman. High-contrast lighting: warm orange-golden light on her face and shoulder, contrasted with a deep teal-blue background. She has dark hair tied in a bun, wearing a black dress full cover. Red lipstick, sharp focus on the eyes, skin texture 8k.
Step two matters most. Almost every unwanted result comes from a detail the model decided was flexible when you wanted it fixed. A good protect line closes that gap before the edit begins, and it also makes every later follow-up easier, because you already know what you declared untouchable. The other steps shape quality, but this one shapes safety. If you only have time to improve one habit, write a better keep list, and put the most important item at the front of it.
Better Results
- Lead with what must stay. Open with the protected details, then describe the change. Keep the shelves, the lamp, and the wall color exactly as they are. A constraint placed first is harder to overlook than one tacked on at the end.
- Ask for one change at a time. Stacked requests make it hard to see which instruction caused a new problem. ChatGPT lets you keep refining in the same conversation, so use that and go step by step.
- Start with a sharp, well-lit source. A clear original gives the model more to work with. Blurry or heavily shadowed photos make it guess, and guessing is where odd details appear.
- Name the light. Describe its direction and softness. Soft window light from the left does far more than the word realistic ever will.
- Use concrete nouns and colors. Replace vague wishes with things you can point to. Say pale oak table and dusty blue wall instead of nicer furniture and better colors.
- Compare against the original every time. Open both versions and check edges, text, and small objects. Drift is easiest to spot side by side, and it often hides in corners.
- Keep a record of what worked. Save the exact wording of any version you liked. A short personal library of working lines saves time on the next photo.
Edited images can slide toward a glossy, too-perfect finish, with smooth surfaces, saturated color, and flawless symmetry. Counter that by asking for natural grain, believable imperfections, and the original’s mood. Leave a little mess: a crease in a cushion, a scuffed floor. A photo that still feels like yours usually convinces more than one that looks flawless.
ChatGPT vs. Other AI Image Models
ChatGPT is the model these examples are built around, but it is not the only option. Gemini and Grok can run the same instructions, and comparing them is useful when a single detail keeps going wrong. Results vary by photo, so treat this table as a starting point and test on your own image.
| Model | Best for | Watch out for |
| ChatGPT as the main model these twelve examples are written around | Following multi-part instructions in conversation, so you can request a change and then refine it with short follow-up messages | Untouched areas can still shift slightly, so keep the protected details list explicit and compare results against your original |
| Gemini as a strong second opinion when ChatGPT misreads one detail of your edit | Lighting, color, and background changes when you want a second take on the same photo to compare | Fine details in small objects or text may drift, so check edges and lettering before you accept a result |
| Grok as a quick third option for testing the same instructions on a stubborn edit | Testing one instruction on another model to learn whether a stubborn problem comes from your wording or the model | Results on precise, protect-everything edits can vary, so test on one photo and compare against your original before committing |
If one detail keeps failing, resist the urge to lengthen the prompt. Past a certain point, extra words add confusion instead of control, and parts of the message start to get lost. Instead, copy the same prompt into another model and compare.
If the second model gets that detail right, you have learned the issue was the model, not your wording. If both fail the same way, simplify: shorten the request, protect fewer things, and fix the stubborn detail in a separate follow-up message. Keep your original photo and wording unchanged so the test stays fair.
Common Mistakes and How to Fix Them
Asking for a mood instead of a change. Telling the model to make a photo feel cozier gives it permission to redo everything. Decide what makes the scene cozy, such as warmer light and softer shadows, and ask for exactly that while protecting the layout.
Forgetting the protect list. Someone asks for a sunset sky and ends up with redrawn buildings. The fix is not a longer request; it is one added sentence naming the buildings, roads, and camera angle as fixed.
Stacking five changes at once. A user wants a new background, new light, a recolored chair, and a cleaner floor in a single message. Something always breaks, and nobody can tell what caused it. Split the job into separate messages and approve each result before moving on.
Regenerating a near-perfect result. The image is right except for one corner, so the user starts over and loses everything. A narrow follow-up that names that corner keeps the rest intact.
Accepting the first result without checking. Small errors in text, edges, and background objects slip through when you glance at the image on a small screen. Zoom in, compare with the original, and look specifically at the places where the edit touched.
Chasing perfection past the point of return. After three or four rounds of small fixes, each new change risks undoing an earlier one. When the image is good, save it and stop.
FAQs
What is the best prompt for editing photos with ChatGPT?
The best structure matters more than any single wording. Good editing prompts name the source photo, list what must stay unchanged, describe one change, and ask the new part to match the original light. Attach your image, paste that structure, and review the result against the original. If one detail is off, send a short follow-up about just that detail instead of regenerating the whole image.
How do I keep the subject accurate and consistent when I edit a photo?
Start with a protect line that names the subject’s shape, color, and position, and put it before the change you want. Ask for one change per message, and compare each result with your original before moving on. If the subject starts to drift, send a short follow-up restoring only the detail that moved. Keeping requests brief and specific also reduces the chance that the model reinterprets parts you wanted fixed.
Can I use my own images with ChatGPT?
Yes. Attach your photo to the chat, say you want to edit that image, and paste your instructions. A sharp, evenly lit original works best, because the model has more real detail to preserve. Use photos you have the right to edit, and think twice before uploading anything private that you would not want to share. Keep your original file saved separately so you can always compare it with the edited version.
Why does the edit change parts of my photo I did not mention?
When an instruction only describes a change, the model decides for itself which other details are flexible. That is how lighting shifts, objects move, or textures get redrawn. Add a protect line that names what must stay exactly the same, and keep the request to one change. If something still moves, reply with a short follow-up that names that single detail and asks for it to be restored.
Final Thoughts
Strong editing prompts do three things: they protect what matters, ask for one clear change, and tell the model how the new part should match the old. Start with a single photo and one use case from this list, check the result against your original, and fix flaws with small follow-ups instead of starting over. Once the pattern feels natural, you will write your own versions faster than you can browse for new ones.